Nowadays we can create webs in many diferent ways. Basically, our initial question will be: Must I use a framework or a CMS (Content Management System)? Each system has its advantages and disadvantages but, we can say that a framework is used when we have to “code a lot”, while a CMS is used when the website has more content than code. In this article we are going to concentrate on the last ones. With these it's possible to create stunning websites without having to programme a single line of code.
There are a great deal of available CMS in the market. The 3 most popular ones are, however, Wordpress, Joomla and Drupal. Wordpress is the most used while Joomla in a second place and Drupal in the third place. Next we have an explanatory graphic (We must take into account that that the data is of 2010).

Wordpress is the most used platform to create websites because it is very easy to use. Joomla is moderately easy to use and Drupal is the most difficult platform to use but, at the same time, the most flexible. Today we are going to speak about Joomla.
The first version of Joomla appeared on the 17th of August, 2005. Joomla is written in PHP, uses object-oriented programming techniques (OOP) and web design patterns and stores information in a MySQL database (among others). Includes features such as page caching, RSS feeds, blog, searcher and international support.
We can install Joomla in two ways: using the autoinstaller of our hosting cPanel or manually downloading the files from joomla.org and uploading to the server we want via FTP. If we use the autoinstaller we must make sure that it is using the latest version of Joomla, currently 3.4. Once installed we we'll meet a screen like this:

The previous screen corresponds to the initial website, from which we will have to add contents little by little through the Joomla administrator. To access the Joomla administrator we will have to write the URL of our website, followed of a slash and the word 'administrator'. For example, http://myweb.com/administrator. Then we will see a login form. We type our username and password and finally we access the Joomla control panel.

Joomla has 5 kinds of extensions: Templates, components, modules, plugins and languages. We can find free and paid extensions in http://extensions.joomla.org.
A template is composed of positions. Each position can be assigned modules, apart from the central position, which is used to assign components. In Joomla 3 a templated called 'Protostar' is installed automatically. It has the following positions:

The most popular components are articles. To create an article we will go to Content > Articles > Add new article. We assign it a title, a text and click on 'Save & close'.

Now we will go to Menus > Main menu > Add new menu item and we will introduce the following data:

If we go to the frontend we will see that a menu item has been created. If we click on it, the article we have just written will appear.

Next, we will install a component that is a contact form called 'Flexicontact'. We will go to http://extensions.joomla.org/extensions/extension/contacts-and-feedback/contact-forms/flexi-contact and we will download the extension to our computer. To install it, we will go to Extensions > Manage.

Then we choose our extension and we click on “Upload & Install”. If everything has been OK, we will see a message in green saying that the installation has been successful.

Flexicontact is a component and, to use it, we will have to go to Menus > Main menu > Add new menu item. In 'Menu title' we type 'Contact'. In 'Menu Item Type' we choose 'Flexicontact'. We move to the 'Options' tab and introduce our email. Finally we click on 'Save & Close'.

If we visit the frontend we will be able to see that another menu item has appeared. If we click on it, the contact form will appear. We must notice that the Joomla components appear in the center of the screen and Flexicontact isn't an exception.

Another kind of extensions are the modules. The modules are less complex than components, and they are located around the central position. Next we will install a module to show the horoscope in relation to the sun and moon. We will access the following URL http://extensions.joomla.org/extensions/extension/living/astrology-a-horoscope/ephemeris-for-joomla and we will download the module to our computer. We will install it going to Extensions > Manage > Upload & install and, if everything has been OK, the next message will appear:

Now we will go to Extensions > Modules > Ephemeris for Joomla. We type a position of our template (for example, Protostar > Right [Position-7]) and we change 'status' to 'Published'

Next, in the 'Module assignment' tab, we change to 'On all pages':

Finally, we click on 'Save' and, if we visit the frontend, we will meet our module:

The fourth type of extensions are the plugins. Now we will install a plugin called 'Modules anywhere', which enables us to embed modules to any article. http://extensions.joomla.org/extensions/extension/core-enhancements/coding-a-scripts-integration/modules-anywhere . As always, we will install the extension going to Extensions > Manage > Upload & Install.
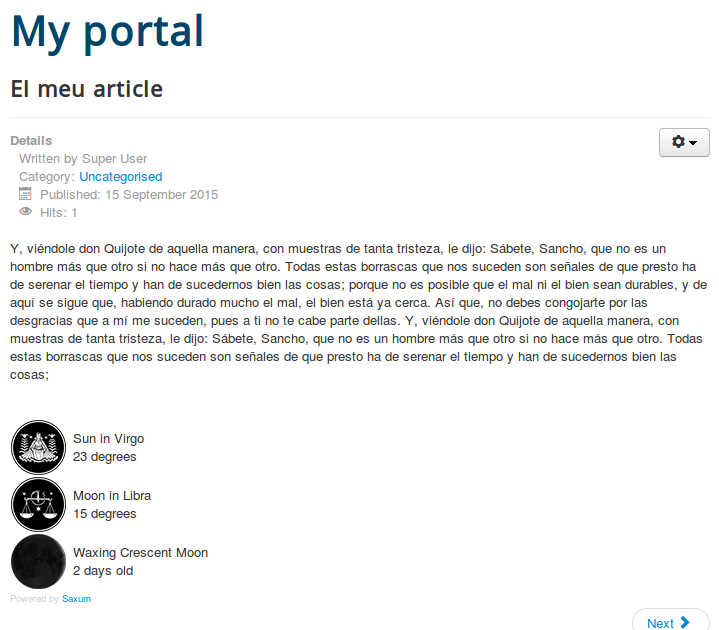
Now we will embed the module we created previously in the article we created previously. We go to Content > Articles > El meu Article and we click on the 'Module' button (This button didn't exist before; it has appeared thanks to our 'Modules anywhere' plugin).

We choose our 'Ephemeris for Joomla' module and we will see that a strange code has been inserted:

We click on 'Save & close' and, if we go to the frontend we will see that the module has been embedded in the article:
The last kind of extensions are the languages, which will enable us to have a website in several languages. In the following document is explained, step by step, how we should proceed to have a multilingual website with Joomla: http://www.slideshare.net/erictiggeler/creating-a-multilingual-site-in-joomla-joomla-3-beginners-guide-eric-tiggeler .
Here ends our little introduction to the Joomla world. Don't be afraid, because we will publish more articles in the future!
| Last posts | ||
|---|---|---|
| Date | Category | Title |
| 25/05/2023 | Wordpress | How to highlight blocks borders in Gutenberg |
| 16/04/2023 | Hardware | How to change the CMOS battery of an Acer Aspire E5-521 laptop |
| 11/06/2019 | Internet | How to log in to websites in a secure way |
| 12/12/2018 | Kdenlive | How to create an animated Christmas postcard |
| 22/10/2018 | Linux | The sl (Steam Locomotive) command |
| 11/10/2018 | Kdenlive | The Chroma Key effect |
| 07/10/2018 | GIMP | How to create a three state button |
| 30/08/2018 | GIMP | How to highlight text |
| 05/03/2016 | Joomla | How to create a Joomla website |
| 07/08/2014 | SEO | How to rank high in the search engines |
